21May 2025
Filling anchor holes in drywall is a common task for homeowners and renters who want to restore their walls after removing wall anchors. Whether you’re preparing to repaint, moving out, or simply aiming for a flawless finish, learning how to fill anchor holes in drywall ensures your walls look as good as new. This guide will walk you through the process, offering practical tips and highlighting when to use joint compound or spackle for the best results.
Step 1: Gather Your Materials
Before starting, collect the following supplies:
-
Utility knife
-
Putty knife
-
Joint compound or spackle
-
Fine-grit sandpaper
-
Damp cloth or sponge
-
Primer and paint
-
Backing material (for larger holes)
-
Drywall patch kit (if needed)
Step 2: Remove the Anchor and Clean the Hole
Begin by carefully removing the wall anchor. Use a utility knife or screwdriver to gently pry it out, taking care not to enlarge the hole or damage the surrounding drywall. Once the anchor is out, clean the area by removing any loose debris or drywall dust. A clean surface helps spackle or joint compound adhere better.
Step 3: Assess the Size of the Hole
-
Small holes (less than 1/2 inch): These can be filled directly with spackle or joint compound.
-
Larger holes (over 1/2 inch): For bigger holes, you may need to use a drywall patch or insert a backing material (like a small piece of mesh or cardboard) behind the hole before applying compound.
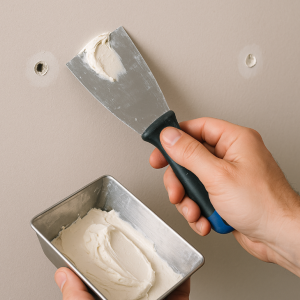
Step 4: Apply Joint Compound or Spackle
For small holes, scoop a bit of spackle or joint compound onto your putty knife and press it into the hole. Hold the knife at a slight angle and smooth the compound flush with the wall surface. For larger holes, apply the compound over the backing material or patch, feathering the edges to blend with the surrounding wall.
-
Tip: Spackle dries faster and is ideal for small repairs, while joint compound is better for larger holes or when a smoother finish is needed.
Step 5: Let It Dry and Apply Additional Coats
Allow the first coat to dry completely. Joint compound may shrink as it dries, so a second coat is often necessary for a perfectly flush finish. Apply a thin second layer, feathering the edges outward, and let it dry thoroughly.
Step 6: Sand for a Smooth Finish
Once the patch is fully dry, use fine-grit sandpaper to smooth the repaired area until it is level with the surrounding wall. Wipe away dust with a damp cloth to ensure a clean surface for painting.
Step 7: Prime and Paint
Apply a coat of primer to the patched area to help the paint adhere and ensure an even finish. Once the primer is dry, paint over the repair to match the rest of your wall. For best results, use the same paint color and finish as the existing wall.
Conclusion: When to Call a Professional
Knowing how to fill anchor holes in drywall empowers you to tackle minor wall repairs with confidence. For small holes, spackle or joint compound and a bit of patience are all you need. For larger repairs or if you want a truly seamless finish, consider reaching out to a trusted local provider like Handyman Oakville. Their experienced team can handle any drywall repair, ensuring your walls look flawless and your home retains its value.
By following these steps, you’ll master patching drywall and repairing wall holes, leaving your space looking as good as new.